Most people don’t think twice about their toaster. It sits quietly on the kitchen counter, doing its job every morning, turning bread into toast in a matter of seconds. Because it seems so simple and harmless, it’s also one of the most ignored appliances when it comes to cleaning.
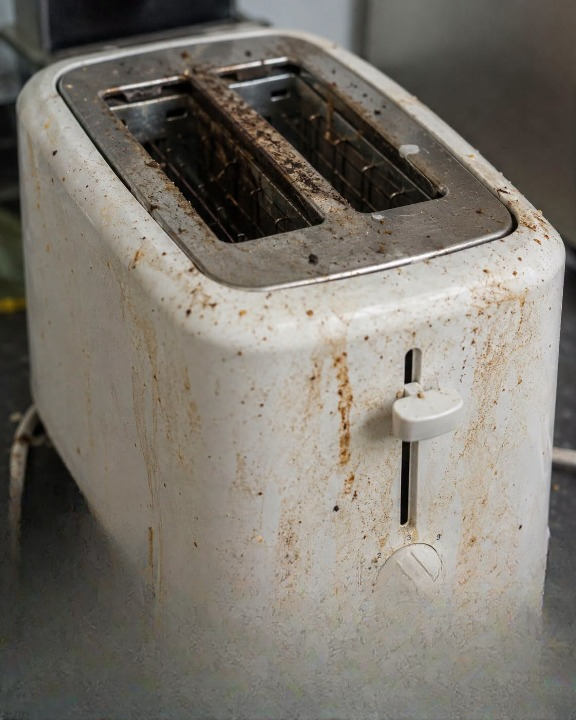
But here’s the uncomfortable truth: your toaster collects far more debris, grease particles, and hidden buildup than you probably imagine. And over time, that buildup doesn’t just affect performance—it can also create unpleasant smells, uneven toasting, and in some cases, even become a minor fire risk if left completely unchecked.
The good news is that cleaning it doesn’t require expensive products, complicated tools, or special cleaning hacks. In fact, a proper toaster cleaning routine is simple, quick, and can be done using things you already have at home.
The first and most important step is safety. Before doing anything else, always unplug the toaster from the wall socket. This isn’t just a suggestion—it’s essential. Once unplugged, allow the appliance to cool completely. Toasters retain heat for a while after use, and rushing this step can lead to burns or accidents.
Once it is cool to the touch, the next step is addressing what most people forget exists: the crumb tray. Almost every modern toaster has a removable tray at the bottom designed to collect fallen crumbs. Over time, this tray becomes a hidden storage space for burnt bits of bread, pastry flakes, and even small food particles that fall through the slots.
Carefully slide the tray out and take a look at it. Many people are surprised by how much accumulates here in just a few weeks. Empty the contents into the trash or sink, then wash the tray with warm water and mild dish soap. A soft sponge is enough—there’s no need for abrasive scrubbers. Once clean, dry it thoroughly before reinserting it. Moisture left behind can lead to rust, especially in metal trays.
Next comes the part most people skip entirely: removing the loose crumbs inside the toaster body itself. Turn the toaster upside down over a sink or trash bin and gently shake it. You don’t need to be aggressive. A few light taps are usually enough to dislodge the larger crumbs that have fallen below the heating elements. You’ll likely be surprised by how much comes out even if you think the toaster isn’t “that dirty.”
However, not everything will fall out with shaking. Some crumbs cling to the interior walls or sit in corners where movement alone won’t reach them. This is where a simple, soft cleaning tool becomes useful. A pastry brush, clean paintbrush, or even a small makeup brush works perfectly. Gently guide it inside the toaster slots and brush downward to loosen debris. The key here is softness—never use anything metal or sharp, as it can damage the internal heating elements or wiring.
It’s important to be gentle and patient during this step. The goal is not to scrub aggressively but to dislodge and guide out trapped particles. Once you’ve done this, you can gently shake the toaster again to release anything that was loosened by brushing.
Now that the inside is clean, attention shifts to the outside, which is often overlooked for weeks or even months at a time. The exterior of a toaster is constantly exposed to fingerprints, cooking oils from the air, dust, and splashes from nearby food preparation. Over time, this builds into a thin, dull film that makes even a decent-looking kitchen appliance appear worn.
To clean the exterior, use a soft cloth that is only slightly damp. If there are greasy spots or stubborn fingerprints, add a small drop of dish soap to the cloth. Gently wipe down all sides of the toaster, including the knobs and levers. Avoid letting water drip into the slots or electrical areas.
If your toaster is stainless steel, there’s an extra detail that makes a big difference in appearance: always wipe in the direction of the metal grain. This helps prevent streaks and keeps the surface looking polished rather than smudged. Once you’re done wiping, immediately dry the surface with a clean, dry cloth to prevent water spots.
At this point, your toaster is already significantly cleaner than it was before—but maintaining that cleanliness is what really matters. The best way to avoid buildup is to create a simple habit rather than waiting until things look or smell dirty.
A quick crumb tray empty every one to two weeks is usually enough for most households. If you use your toaster daily, you may want to do it slightly more often. A deeper clean—removing crumbs, brushing the interior, and wiping the exterior—once a month is typically sufficient to keep everything in good condition.
These small routines don’t take much time, but they make a noticeable difference. Bread will toast more evenly when crumbs aren’t interfering with heating elements. There will be fewer burnt smells when leftover debris isn’t reheating and smoking. And your kitchen will simply feel fresher, especially in smaller spaces where appliance odors linger more easily.
There’s also a safety benefit that often goes unmentioned. Built-up crumbs inside a toaster are exposed to repeated heat cycles. Over time, this can lead to scorching or smoking, especially if older crumbs are repeatedly reheated. Keeping the interior clean reduces that risk significantly and ensures the appliance runs more efficiently.
In the end, cleaning a toaster is not about perfection or deep maintenance routines. It’s about small, consistent care that prevents buildup before it becomes a problem. Most people underestimate how much difference these tiny habits can make in everyday kitchen hygiene.
So the next time you make toast, take a moment to think about what’s happening inside that small metal box. A few minutes of simple cleaning can extend its life, improve performance, and make your kitchen feel noticeably fresher without any special tools or effort.
Sometimes the most overlooked appliances are the ones that benefit the most from a little attention.
Uncategorized